Original Link found here
by William Li

1. Introduction
This method is a tool to help you draw the human form. It is by no means the best way or even a fast way. Instead, this method is aimed at thinking and setting up the human form in a threedimensional space.
Classical animation (most notably Disney) uses a similar way of working out their characters. In these kind of animations a good understanding of the character in a threedimensional space is important to achieve a convincing motion in time.
Using this method will help you form your thoughts on the human body posing on paper rather than in your mind. It will also help you avoid that frustrating 'running out of paper phenomenon'.
2. Pose
Basic anatomy
stickfigures
Wait, don't go away yet! Stickfigures may seem simple...but when was the last time you made a good one, eh? ;)
Don't underestimate the power of stickfigures and what they can do for you. So how can stickfigures be useful, you ask?
First of all, they represent a very important basic element of any subject you draw: length proportions. Anyone knows proportions define almost everything in a drawing. A leg too short or a nose too big can ruin any grand piece of art. So, have some respect for the stickfigures! ;)
Let's take a look at stickfigures. They vary in detail, usually depending on how accurate you want to compose the body. We'll get to posing later. First we look at proportions of a standing figure.
 Stickfigure 1 Stickfigure 1This is the basic stickfigure. You can see the head, torso, arms and legs. You can't do much with this one, except practising the proportions of these body parts. | |
 Stickfigure 2 Stickfigure 2With this version you can do something more. You get to decide the proportions of the arm- and leg-parts. | |
 Stickfigure 3 Now this must be the most advanced stickfigure there is: I bet you never saw any kid draw it this way! Added are the width of shoulders and pelvis. In the next paragraph the importance of mastering this stickfigure will show. |
Lesson
Try to draw these standing stickfigures and see if you master their proportions. This is a fast and easy way to see how your knowledge of the basic human proportion is. You can judge the results yourself quite well without being distracted by 'cool' armour, hair, etc.
Using stickfigures is also a very fast way to determine how big you may draw your humans on your paper. So you need not to be afraid to run out of paper anymore, because now you can see beforehand where that foot or hand will end up.
Body language
Stickfigures, again
Now that you know how important it is to master proportions through simple stick figures, we go to the next use of stickfigures: 'the pose'. Or simpler said: what is your character doing?
With stickfigures you can easily try out many, many positions before you commit to one for the real drawing. Using this as a preparation to your drawing also helps you see beforehand if you can pull off the pose, if you need reference material for it, if you will run out of paper while drawing, etc. Yes, the lowly stickfigure does help you plan your next masterpiece.
Stickfigures in action
Here are a few examples how you can use a stickfigure to determine a pose. You will also see quickly enough if it is a natural or comfortable pose. Otherwise you could try to mimick the pose yourself and find out ;)
Here are a few examples how you can use a stickfigure to determine a pose. You will also see quickly enough if it is a natural or comfortable pose. Otherwise you could try to mimick the pose yourself and find out ;)
 | Throwing a spear. |
 | I think this one is dancing or something... |
 | The running man Here you see the use of some foreshortening in the pelvis and the shoulders because we are looking from his side. |
 | The gladiator Again some foreshortening in the lower arm with the 'sword'. Also note the twist in the torso: a very natural stance, especially when turning to see something. |
 | Sadness or looking for his contact lense... |
 | The lounger Here is another example of a twisted torso. Shoulders and hips are turned at an angle. |
 | Weirdo Either impossible or very uncomfortable. At any rate it looks silly ;) |
Lesson
Try drawing stickfigures in action. Pay keen attention to the proportions. You will gain some insight to dynamics and motion of the human body.
Try drawing stickfigures in action. Pay keen attention to the proportions. You will gain some insight to dynamics and motion of the human body.
Balance
When you set up a pose, you will need to take into account its center of gravity. This center is typically located in the underbelly of a human, just above the crotch. The weight of your legs make up for almost half of your total body weight.
The position of it in regard to the "resting points" of the body say something about the balance of the body. The following examples demonstrate this.
red circle = centre of gravity
red arrow = direction of gravity
green arrow = resting point
red arrow = direction of gravity
green arrow = resting point
 | Standard walk As you can see, the centre of gravity lies between the two resting points. This results in a balanced stance. |
 | Fall Here the center of gravity lies next to the resting point. This is inbalance, causing the body to move sideways to the left. |
 | Balancing act Well, what it says. This is possible because the body is 'spread' fairly symmetrically. Compare with the next one... |
 | Here the body leans to the right, causing inbalance. You will notice that the center of gravity shifts a bit to the right as well. |
 | Run stickfigure, run! When running the centre of gravity lies in front of the resting point. As you can see (or feel), this is an unbalanced pose resulting in a falling motion of the figure. He won't fall of course, because he is running at speed and will put a foot in front of the other preventing him from hitting the ground. (Physically you want to propel the mass - referenced by the centre of gravity - forward, thus having the propelling force - from the feet - at the rear.) |
 | Leaning The figure is at rest because the centre of gravity lies between the two resting points: one foot and a shoulder. The foot of the crossed does not contribute to standing (it's at rest, hanging). |
 | Crouching tiger, hidden dragon Eh.. i mean a high kick. Because the centre of gravity is to the right of the resting point the body will 'fall' towards the right, giving it a kicking momentum towards the right. Btw, this is a wrong way to kick, people say. |
Of course you do NOT have to make the pose a balanced one. An unbalanced pose conveys dynamics, action and motion, while a balanced pose results in a calm and tranquil image.
The above is just an aspect you should consider when you set up a pose. It can enhance your drawing greatly in a natural looking way.
The above is just an aspect you should consider when you set up a pose. It can enhance your drawing greatly in a natural looking way.
Motion and action
The body is a supple and agile system, influenced by gravity. It has no natural rigid position.
 | First image shows a exaggerated walking gait. Notice how the hipjoints move because of gravity. The motion of the shoulders usually move in reverse to the hipjoints. The second image shows a sideways lying person, resting on 1 arm. This causes the rest of the body (ribcage) to hang on the resting shoulder. Also, the spine column is somewhat flexible, it can be bent a little. |
3. Construction
To construct something you must understand it. So when you want to draw a human body you should at least know a little bit how it is made up.
The skeleton
At the basis of the body is the skeleton of course. In the stickfigure system we already saw something of it. Now we go more into detail. The human body consists of the following characteristic parts:
 | Front view
|
 | Side view Note the curve of the spine (the arms are left out, since the focus here is on the spine). |
We can use a simplified form of the skeleton when we want to setup a human figure:
 | This body setup gives a bit more insight now. |
Body building
With the above about the skeletal parts of the body in mind we now proceed to the 'outer stuff': the muscle or fat, if you like. For a analytical approach we can use solid masses to represent these parts, such as ellipsoids, cylinders and other forms.
Basically you choose the form that most closely resembles the part you want to draw.
Basically you choose the form that most closely resembles the part you want to draw.
Can't we just proceed with drawing the actual body now?
Of course you can do that. But the argument before was to use stickfigures - and now simplified forms - to setup a body without the distraction by details, so you can focus on correct proportions, balance and pose.
With this extra step you have overview of the volumetric proportions.
Of course you can do that. But the argument before was to use stickfigures - and now simplified forms - to setup a body without the distraction by details, so you can focus on correct proportions, balance and pose.
With this extra step you have overview of the volumetric proportions.
 | A volumetric representation of the body parts. The red lines are connection lines. Now you see the body parts in an analytical way, basically to avoid 'weirdness' in the setup. |
Solid masses setup in practice
 | You can now use this method to fully describe the pose and volume of the body in any pose. Look at the examples. Left is the first draft with stickfigures. To the right are the volumetric expansions on the stickfigures. You will note that you do not need to draw the cylinders like actual cylinders. Instead, you can just 'connect the joints'. As you can see these sketches resemble the well-known mannikins - wooden puppets made from cylinders and ellipsoids. If you can find one, use it. But knowing to draw these setups from your mind without a puppet in front of you, will give you an added advantage. |
 | Details This method is also quite useful for analytical setups of details of the body, for example everybody's all time favourites: hands and feet ;) |
4. Variations
Of course you do not have to abide by the standard human body proportions. You can exaggerate volumes to suit your own needs.
| 1. Humans | . |
  | Humans come in many variations. Here you see some examples:
Note that i used an 'all-in-one' (ribcage + muscles) upper torso for the muscle man. Sometimes it is easier to draw the whole volume without first drawing a ribcage. For all the others i first drew the ribcage. It's up to you what you need. |
| 2. Other creatures | . |
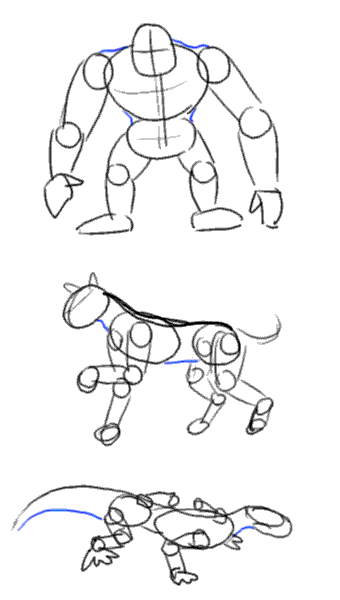 | This method is useful for many other creatures that have a skeletal build similar to ours. To be precise: for all creatures that descend from the dinosaurs (this includes all mammals and birds). Examples:
Again, for the muscular ape-man i drew the ribcage+muscles as one. Usually for muscular bodies it is not necessary to setup the ribcage. The same logic goes for the arms and legs: you don't need to draw the lines first. You can draw the joints and draw the lines for the arms and legs in between. |
| 3. Cartoons | . |
 | Yes, cartoons - especially the animated ones from the forties and fifties - make use of solid masses, which makes them easily definable. As you can see, you can freely interpret the volumes of the body. You don't need to define a ribcage or pelvic area if you don't need it. And joints are hardly necessary for cartoons, they flex like rubber all the time anyway ;) If it fits your purpose, it is good. |
That's all folks!
This is the end of this tutorial. The underlying message is that you need a correct basis for your drawings. To achieve this it is best to see your subjects in a simplified view. Stickfigures and solid masses can help you do this.
The biggest benefit of this technique is that you'll be able to quickly try out numerous poses easily, before you commit to that one pose. This method can also avoid that 'running out of drawing space syndrome'. It can save you time and certainly a lot of frustration later. In the end you will have a better composed and thought out image.
I'll end with this last demonstration :)

focusing on the "weight" of an illustration really helps it to look more realistic
ReplyDelete