1. Drawing the Boat Outline
First, create a large rectangle and fill it with a dark color, as the background. It may also be useful to add a rough sketch of your design, to aid in drawing the outline. Now open up the layers palette (F7) and lock this layer. This prevents you from selecting this layer while drawing and editing.Now, we are going to use the pen and pencil tool to draw the outline of the ark. Create a new layer and label it “Outline” .

Now start to draw the major outlines of the ark in white. Begin by drawing in the straight simple lines using the pen tool (P). Don’ t worry about the size of the stroke, it can be changed later.

You can use the pen tool to draw the rest of your outline. If you have a graphics tablet, you may find it just as easy, and possibly quicker, to draw it with the pencil tool.
First, double click on the pencil tool to change its settings. Disable “Keep Selected” , and keep “Edit selected paths” enabled. I find that this makes drawing easier. You will find that if you try to draw multiple lines with both of these enabled, your lines will keep getting replaced. Keep the smoothness value fairly high if you wish, about 50%, as you are going to be drawing large, smooth outlines. This takes away some human error and shakiness.

Now, draw in the major outlines of your rough sketch. Try to keep your lines as simple as possible, and try not to draw too much in one stroke. You can always join the paths together later. Also, do not worry about accuracy. Just concentrate on getting all the major lines drawn.

You should now start adding more details to the outline. Do this using the Pen Tool.

2. Refining the Outline
There are numerous methods to refine the outline. To move points of a line, simple select a point using the Direct Selection tool (A), and drag it to wherever you wish. This is useful for moving the ends of lines that don’ t quite match up.
You may also want to edit the actual line you have drawn. If you want to redraw a part of a line, simply select the line using the Selection tool (V). Now, use the pencil (N), and because “Edit selected paths” is enabled you can simply redraw the part of the path you wish to correct. Experiment with this technique, it is very useful for correcting and adjusting drawings.

You can also edit the curvature of a line by moving these points. The pen tool (P) is useful to add or remove these points. Remember that to change the curvature of the line segments at a specific point, hold down Alt and click and drag with the pen tool on one of these points. I find it is easier to do this type of work with a mouse instead of with your graphics tablet.
When drawing, you will notice that the number of anchor points is generally less when you have a higher smoothness setting for your pencil tool. The final important step when refining your outline is to make sure that all the edges meet up. If you are not happy with just dragging the edges together, you may join them. To do this, use the Direct Selection tool (A) and select the two end points you wish to join by holding down shift and clicking on each end point. Only the two end points should be selected. Then Join using Object>Path>Join, or Ctrl+J.

When you are done, hide the rough sketch. It is now time to work on the stroke of the outline.

To change the stroke size, select the entire ark (Ctrl+A) and in the Stroke palette, change the weight to a certain value. I used 3pt. Alternatively, you can make the stroke more interesting by applying a brush. Do this by opening up the brushes palette (F5) and clicking on new brush. Select “New Calligraphic brush”. Now change the diameter to 3pt and try decrease the roundness to a value such as 25%. Name your brush and click OK.

Notice that your new brush is now visible in the brushes palette. Select your entire ark and then click on this brush, applying the effect. You will notice that the outline has a more natural look to it now.

3. Using Graphics Tablet to Sketch
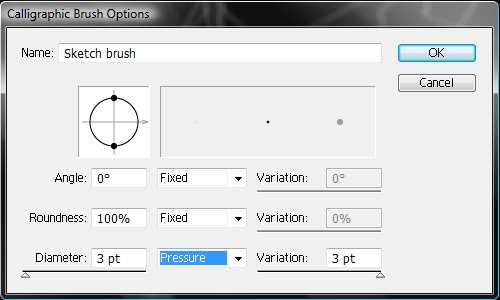
Now we are going to be using some of the pressure sensitivity settings common in most graphics tablets. The most common setting is pressure, which is how hard the pen is pressed against the graphics tablet.Firstly, create a new calligraphic brush as done before. You may leave the roundness at 100% for now. (You will still be able to see change these settings later, once you have finished drawing.) Set the diameter to 3 pt yet in the dropdown box to the right, change the value from Fixed to Pressure, and then set the variation to its maximum, which will be 3 pt. This will change the size of the line stroke depending on how hard you press with your pen.
Notice the other options available include Tilt and Rotation. If you have an advanced graphics tablet that supports these options, set Angle to Rotation and Roundness to Tilt. These are some very nice options for advanced users, yet you can still draw some very nice lines using just the pressure sensitivity.
Name this brush “Sketch brush” or something similar.
Now create a new layer, and select the Brush Tool (B). Double-click on the Brush Tool to change the settings, as we did with the pencil tool. However, this time make sure both “Keep Selected” and “Edit selected paths” is disabled.
Smoothness is recommended to be low for sketching, as it can take a lot of the personality out of a sketch.

It is recommended that you play around with these settings and draw a few lines, trying out different pen pressure while drawing. Draw a few lines trying out different smoothness settings.

When you are happy with the settings, it is time to add some detail to your drawing.
4. Adding sketch Details
Still using white, I then sketched in the details of the ark, with some shading. For shading and creating a sketched effect, it is important to use small, frequent strokes, taking in mind the pressure sensitivity of your graphics tablet.
Now, you can see why disabling the brush options is important. Not keeping the drawn stroke selected enables me to instantly see if I like the look of it without the selection obscuring it. If I don’t like the most recent stroke, it is easy to undo (Ctrl+Z) and redraw the stroke. It is also useful to not leave brushed paths selected, as when changing brushes or colors I would often forget to deselect my most recent stroke, causing its color or stroke to be changed.
If “Edit selected paths” is enabled, you will keep replacing previous strokes while sketching. Once done, create a new layer behind all the white layers. It is going to be useful if you create a new layer every time you add different sketching details, as each brush stroke within the sketch will be a separate object and hence different sketched details will be hard to separate if all on the same layer.
Now select a different color, such as orange (#E48926), which I will use for shading. It is important to use a certain color exclusively for shading and another for highlights, although it is recommended that you experiment. Using small strokes, sketch in some shading.

Do the same with another color, such as sky blue (#6DC7B8). I will use this color for the highlights.

Finally you can add some grass and small touch-ups as shown below. Try adding these using different brushes.

5. Finalizing the Design
Once you have finished, it is easy to edit, delete and add more brush strokes as desired. You can also edit the brush settings by double clicking on the brush you used in the brushes palette. Try tweak the roundness, angle and size of the brush. You now have the option to apply these new settings to all strokes created using this brush. This is very useful for customizing and finalizing your design. Try this for the brush used for the outline too.You may want to try to resize your final sketch. When doing so you may notice a strange effect, as shown below.

This is because the stroke remains the same diameter as the image is scaled. To fix this, enable “Scale strokes” and effects under Edit>Preferences>General (Ctrl+K). This will ensure the stroke sizes are scaled in proportion to the image.

I hope that you found this tutorial useful. With these tips and tricks you should be able to create very interesting sketches and designs in Illustrator.
Original tutorial with downloads located here: http://www.vectordiary.com/illustrator/sketching-a-boat-with-graphics-tablet-tutorial/
That boat looks awesome!
ReplyDeletenice boat ;D I was never good with illustrator. D:
ReplyDeleteThat looks awesome, how much was your tablet and what what make?
ReplyDeleteawesome dude
ReplyDeletenice post!
ReplyDeletelooks complex haha
ReplyDeleteYou are seriously so awesome. Thank you for this. I need to get Adobe Illustrator if I am to seriously tackle my projects. This tutorial is so spot-on for what I need after getting the program. Thank you again!!
ReplyDeletelooks pretty bad ass, I have been wanting a sweet tab for a while now
ReplyDeleteNice and informative. Thank you for this!
ReplyDeletesweet boat
ReplyDeleteThat's great work! Could you make me a new banner for my blog? I need someone with some actual skills to do it up right.
ReplyDelete